How I built my blog in 30 mins without a backend
Published
- 4 min read

If you are a lazy developer like me, this blog is for you
Introduction
Two years ago I tried to clone Medium blog design using Figma, I hate design and frontend ‘I used to be a designer for fun between 2016-2020’, now focusing on backend, I almost lost all my visual creativity skills, so designing a website is like a punishment for me.
Solution
Anyways, let’s get to the good part, after two years procrastinating building my blog, yesterday I thought about looking for a free template to use for my blog, and I only have to build the backend which I usually enjoy hh, by the way this is the case for most of my apps including:
And many more projects for some clients.
After a few minutes, I was impressed by the template I was looking for which was pretty similar to Medium “Especially with light mode”
A gorgeous Astro.js template built.
I know you’re looking for the link hh, here is the repo: Repository
No-Backend
Now the template is here, cloning the repo on my computer [npm install, npm start] and yees, this is exactly what I’m looking for.
But wait, how are those blogs still there!! Are they using a random blogs API! Are they static? How about security and content management?
After a few minutes looking at the codebase, I found out that the blog is fully static! No API/content management tools needed.
You just need to create a new .mdx file with your blog content, set a few metadata ‘Description, title, cover, date, tags & category’.
‘Unfortunately it will only increase your commit history each time you create a static blog hh’
Also, you can create unposted blogs by adding ‘draft’ to metadata.
The beautiful thing about this template is not just the static content, but the easy configuration and the features it provides which make it easy to deploy.
And it cost me literally $0 to deploy it using GitHub Pages. Here is how $0 blog
Cost me $0
As a [شلح], and it’s obvious “check my family name hh”, I only try to minimise my expenses [Also as a broke student hh]
I used GitHub Pages for deployment which is free for public repos, [I have GitHub student pack hh I use it for private repos hh]
The deployment process is easy and well documented here Deploy Astro to GitHub Pages
A few additional optional steps [Required if you don’t have a domain/subdomain],
only if you want to have a base URL instead of the default URL <username>.github.io/, so you can make it <username>.github.io/my_blog :
- You should add the base_url within the config file /src/data/site.config.ts
       export const siteConfig: SiteConfig = {
	site: 'https://achrafaitibba.github.io', // Write here your website URL
	base_url: '/blog-test/', // Write here your base URL
	..
	// rest of your code
}- The next step and the most annoying one:
Changing every single url/href in your project to make it use the base_url you set,
I wish there was an extension but anyways, this is the step that took me most of the time.
And example of the hrefs you should update:
— Before
       <link rel='icon' type='image/svg+xml'
	href='/favicon.svg' />
— After
       <link rel='icon' type='image/svg+xml'
	href={`${import.meta.env.BASE_URL}/favicon.svg`} />
Views counter
Views counter without a backend! No session!!! And no API keys!

I recently read an article by Youssef El Azizi about adding a views counter without a backend/API to your Astro project, it wasn’t interesting that time [Why would I need it hh, I don’t even use Astro].
You can simply read it, a very useful article and easy to implement Blog
Subscribe button
Okay, another challenge, how to collect subscribers’ emails without an API, This is a bonus and a hack with Google Forms:
- Create a form with ‘short answer text’ and make it required
- Publish it and open the URL in a new tab
- Open dev tools [Ctrl + Shift + I]
- Network tab and search for formResponse
- From the header this is your formId

-
And from the payload you need [Entry, fbzx]
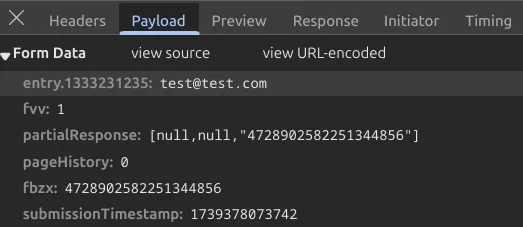
-
This is the code I used for my subscribers in my website Subscribe;
       async function submitForm(email) {
        const formUrl =
          "https://docs.google.com/forms/d/e/<FormId>/formResponse";
        const formData = new URLSearchParams();

        formData.append("entry.<entryCode>", email);
        formData.append("fvv", "1");
        formData.append("pageHistory", "0");
        formData.append("fbzx", "<fbzxValue>");
        formData.append("submissionTimestamp", Date.now());

        try {
          response = await fetch(formUrl, {
            method: "POST",
            body: formData,
            mode: "no-cors",
          });
		  	// your success code here
        } catch (error) {
			// your error code here
        }
      }
Confession hh
It took me more than 30 mins, I don’t wanna lie (حرام).
But it won’t take you longer than 4H